2.5.1- Importing A Number From Twilio - US & International Users
Importing Your Own Number
*Works with any 3rd party telephony service that allows for SIP Trunking
This is a comprehensive guide on importing numbers into the system for your AI assistants to use for both inbound and outbound calling. This is the way to integrate with your telephony provider that supports elastic SIP trunking. You will need to set up a SIP trunking and configure your number to point to it, and then import that number to the AI system.
We will use Twilio as an example here. You can use other telephony providers that support elastic SIP trunking as well.
In this context, the elastic SIP trunking is used to connect our VoIP with PSTN so that your AI can make and receive calls.
Let’s get started ⬇️
1. Navigate to twilio.com (console.twilio.com) and you should see a similar page to the screenshot below:

2. Navigate and click on “Explore products”:

3. Next, on the menu for products - we need to click on “Super Network”:

4. We need to click on “Elastic SIP Trunking” - this is how we will be able to automate inbound and outbound calls on your behalf:

5. Now, we should be at the “Elastic SIP Trunking Dashboard”. We are getting close - hang in there. Ok, so now click “Get Started” right under the main header on this page:

6. Click on “Create a SIP Trunk”, then give it a name - I just called mine “AI Calling”. Then create:

7. Let’s toggle some general settings to make everyone’s life a little bit easier. Ok, I enabled Call Recording here (Record from ringing), I enabled Call Transfer (SIP REFER), and I set my Caller ID for the Transfer Target to be the caller ID as transferee. Then I clicked the blue save button in the bottom left:

8. Stay with me here. If you got this far, you’re doing good. It’s about to get a little fun though so just take a breather and let's do this. Ok, so now we need to set up termination (this is for outbound). Click on Termination over on the navigation menu to the far left (in screenshot). The termination SIP URI here is like… really important. We would use it in later steps so save this for later:

9. Ok, got it? Saved it? Good to go? Let's do the next thing. Yes it will say inactive - we are about to activate it. We need to whitelist some IP addresses. If you don’t know what that means - it's just saying let us be able to access it. Now - For your elastic SIP trunk to accept our outbound request, you need to whitelist some IP addresses. Which ones? All of them. Currently, our SIP server does not have a static IP, so you need to whitelist all the IP addresses in the range like following:
- Click on the “+” button next to IP Access Control Lists under Authentication (its like right below what we just did)
- Create the first list:
Friendly name: default ACL 1
Address: 0.0.0.0 / 1
- Create the second list:
Friendly name: default ACL 2
Address: 128.0.0.0 / 1
- Click the blue save button in the bottom to the left 🙂


10. We are in the final inning! Ok, now - to set up inbound automation, (after saving your work) we need to go to Origination right underneath where we clicked on Termination. We just need to add a link here. Cool? Add a new Origination URI, add our origination URI and good to go:
Origination URI (For you to copy): sip:ecabe71af1354f858dc49374b8293591.sip.telnyx.com


Adding a number to use:
Ok, now you have your cool new AI calling trunk to put numbers. So, in the top right corner, click on “Add a number” and either buy a number or add an existing number. Hint hint - if you buy a number you still need to click on add existing to add it to this trunk.

We need the number in raw format (+country code, then number with no space, no special characters) and your termination URI. Remember that from earlier? We need these two things to import our number into the system. Get those and move to the next steps.
Importing numbers into Assistantz ⬇️
1. Go to your AI portal and navigate to the number tag in the main navigation or within an assistant - then click on import a number: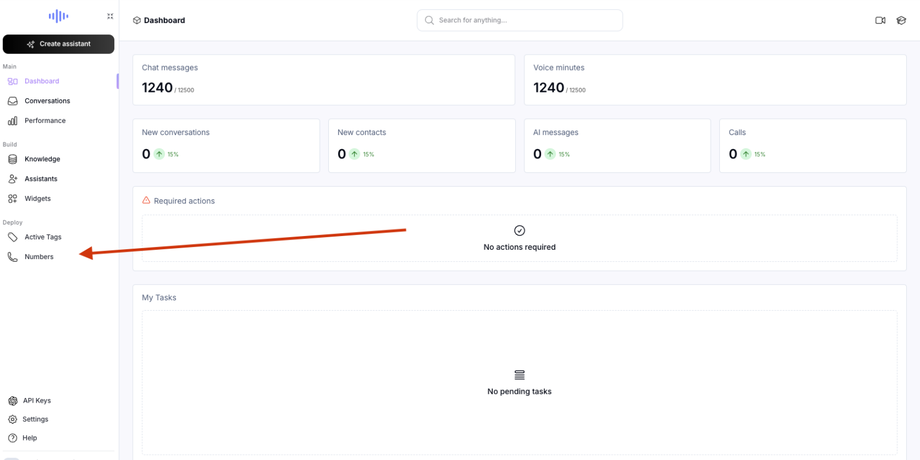


2. Input your raw formatted number (+country code, then number with no space, no special characters) and your termination URI - then click import:

3. Then you are good to sync it with your assistants and make outbound calls / receive inbound calls for the AI to pick up from that number. We will save your termination URI for you so you don’t have to remember it everytime, just bring the number over.

Debugging Guide:
Go to twilio logs. There is actually nothing we can do or see and if you are having trouble with inbound or outbound calling, make sure you follow these steps. If so, reach out to the telephony’s (aka twilio) support because we have 0 control here.
We are storing the info you provide as a way to configure the SIP packet, and it's up to the telephony system to decide if it goes through. Some things may be your account needs verification, you put in a non-raw formatted number, come country codes require additional regulation - go to your telephony provider for debugging.